How To Create Custom Navigation Menu In WordPress
Posted by TotalDC
Are you creating a WordPress website and feel that a hardcoded navigation menu is not enough? You can create a custom navigation menu in WordPress straight from the dashboard without altering your website’s code. In this article, I will show you how to do just that.
How To Register Custom Navigation Menu In WordPress
The first thing that you need to do is to register your custom menu location. To do you will need to create a PHP function in your themes functions.php file.
function my_custom_menu() {

}
After that, you need to add a bit of code to register your new custom menu or menus. For this you will be using register_nav_menu function. You need to write this function inside the curly brackets of the function you just created:
function my_custom_menu() {
  register_nav_menu();
}
Now you need to give your register_nav_menu function a location identifier parameter. This will be used when you want to display your menu on the front end of your website.
In this example, my menu is going to be the main menu in the header section of the website, so my location identifier will be headerMenuLocation. It is the first parameter of the register_nav_menu function and it has to be placed in single quotes. Just like that.
function my_custom_menu() {
  register_nav_menu('headerMenuLocation');
}
The next and final parameter you need to add to the function is the description parameter. This is the name of the menu, it will be displayed in the WordPress dashboard when you will be setting up your menu. For this example let’s simply call it Header Menu Location.
function my_custom_menu() {
  register_nav_menu('headerMenuLocation', 'Header Menu Location');
}
To run your function you need to use the add_action function. This must be placed outside of the curly brackets like this.
function my_custom_menu() {
  register_nav_menu('headerMenuLocation', 'Header Menu Location');
}
add_action();
This function needs two parameters to run. The first parameter tells WordPress when to call the function, and for this, you are going to use after_setup_theme.
function my_custom_menu() {
  register_nav_menu('headerMenuLocation', 'Header Menu Location');
}
add_action('after_setup_theme');
The second parameter tells WordPress which function to call. In this example, your function is called my_custom_menu.
function my_custom_menu() {
  register_nav_menu('headerMenuLocation', 'Header Menu Location');
}
add_action('after_setup_theme', 'my_custom_menu');
Here you have a working function,
How To Register Multiple Navigation Menus In WordPress
It is possible to register more than one menu in WordPress. To do that you have two options. First – everything stays the same as with a single menu, you just simply add as many functions as you want.
In this example from above, you added a new custom menu that is supposed to go to the header of the WordPress website. Let’s look at how you can a couple of menus to the footer. Here’s how it looks.
function my_custom_menu() {
  register_nav_menu('headerMenuLocation', 'Header Menu Location');
  register_nav_menu('footerLocationOne', 'Footer Location One');
  register_nav_menu('footerLocationTwo', 'Footer Location Two');
}
As you can see in this example I registered two menus that are supposed to go to the footer of your website. Everything looks the same as when registering one menu, just different location identifiers and different names that will be visible in the WordPress dashboard. Now let’s call our function.
function my_custom_menu() {
  register_nav_menu('headerMenuLocation', 'Header Menu Location');
  register_nav_menu('footerLocationOne', 'Footer Location One');
  register_nav_menu('footerLocationTwo', 'Footer Location Two');
}
add_action('after_setup_theme', 'my_custom_menu');
Here as you can see stays the same as previously.
Or you can achieve the same result by using a PHP array and a slightly different WordPress function. Here’s how it would look.
function my_custom_menu() {
    register_nav_menus(
        array(
            'headerMenuLocation' => 'Header Menu Location',
            'footerLocationOne' => 'Footer Location One',
            'footerLocationTwo' => 'Footer Location Two'
        )
    );
}
add_action( 'after_setup_theme', 'my_custom_menu' );
Both methods work. It’s just your preference which one of these two methods looks better for you.
How To Display Custom WordPress Navigation Menu
Now that you have registered your custom menu or multiple menus it’s time to display it on the front-end of your website. To do that you will need some more code.
Wherever you choose to add your menu, you need to drop into PHP as you are going to be using another WordPress function to call in your menu.
To drop into PHP you need opening and closing PHP tags.
<?php

?>
Within these tags, you are going to use a function called wp_nav_menu. This function is used to display a menu that you have registered.
<?php
    wp_nav_menu();
?>
Now within the wp_nav_menu function, you have to use an array. Just like that.
<?php
    wp_nav_menu(
        array (
        )
    );
?>
To tell WordPress that you want to display the navigation menu, that you have registered, in this exact place you will need to use theme_location.
<?php
    wp_nav_menu(
        array (
            'theme_location'
        )
    );
?>
Then add => followed by the location identifier you prescribed to your menu in the functions.php file. For this example let’s say that we want to add a custom WordPress menu to the header of your website and in this case, your code in the header.php file will look just like this.
 <?php wp_nav_menu(
     array(
            'theme_location' => 'headerMenuLocation'
          )); ?>
In this example, you also have an option to add two custom menus to the footer of your WordPress website. The code in your footer.php file will look like this.
     <?php wp_nav_menu(
        array(
              'theme_location' => 'footerLocationOne'
            )) ?>
or
 <?php wp_nav_menu(
        array(
              'theme_location' => 'footerLocationTwo'
            )) ?>
Not that you have registered your custom menu in function.php and placed code in header.php and/or footer.php, you need to hover over Appearance and click on Menus In the WordPress dashboard.

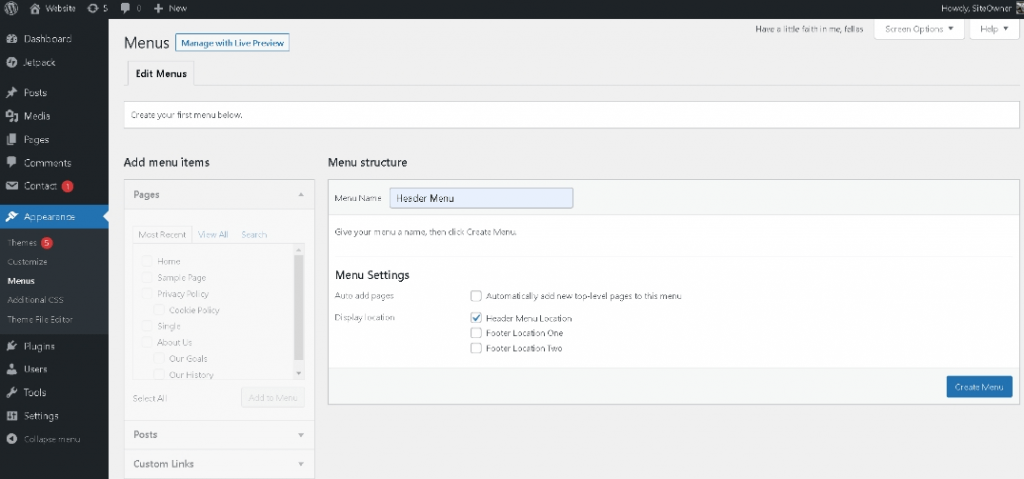
When you click on the Menus option you will see the following screen.

First of all you have to give your new custom WordPress menu a name. In this example let’s keep everything simple and call it Header Menu since it will be in the website’s header section.

After you type in the name of the menu, mark the needed check box below. In this case, I checked the Header Menu Location, because I know that that is the location that we have created in header.php and click Create Menu.
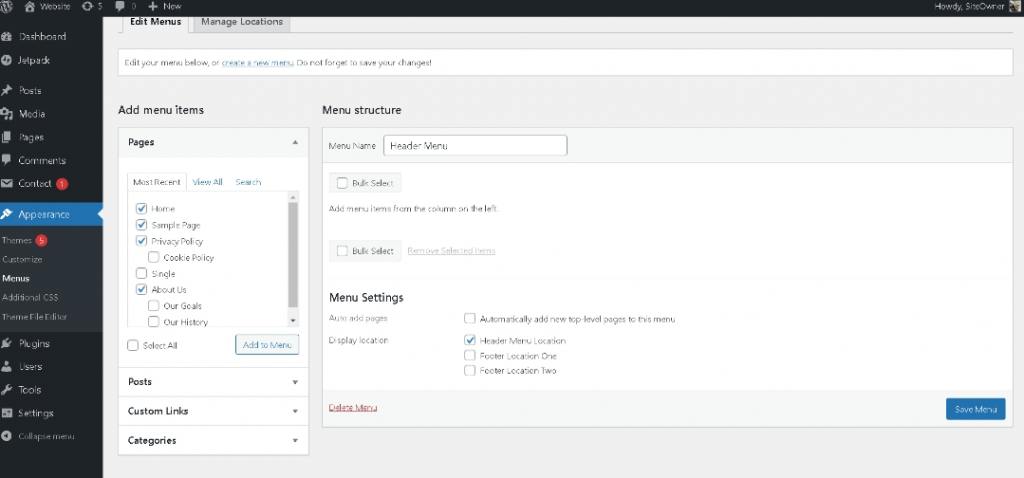
After you have created the menu, you will see that the left-side menu becomes active. Here you need to select all pages, posts, or custom links that you want to add to your newly created menu and then click the Add to Menu button.

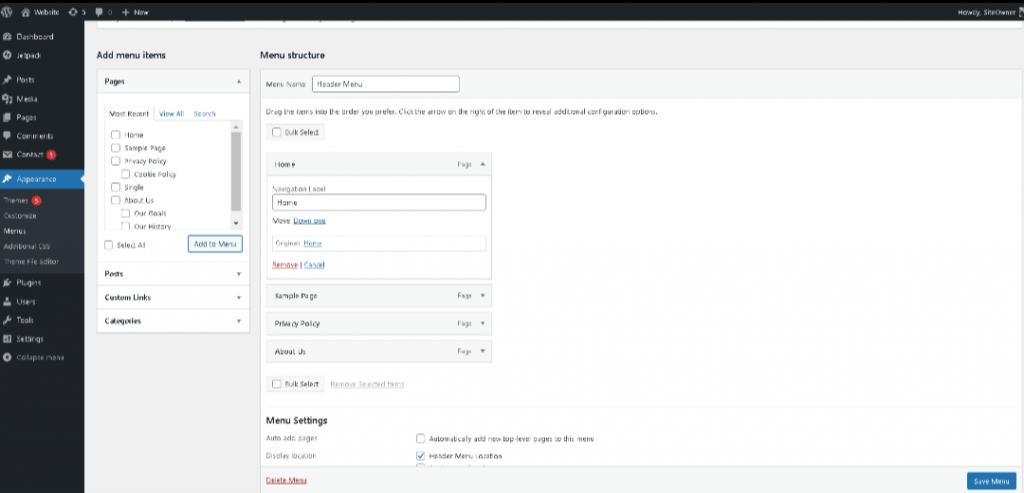
When you click Add to Menu, all selected items will jump to the right side of the menu screen.
Here, you can drag and drop menu items into place. If you click the expansion arrow next to each item, you can also set a label for your menu item or remove it.

When you are happy with your menu simply click Save Menu.


